Sloped and uneven yards complicate fence planning. A line that looks level from the deck may float off the ground halfway down the hill or leave a gate that scrapes every time it swings. Before you order panels or schedule an auger, it helps to sort through slope-specific decisions about panel style, post depth, water management, and gate placement. This article covers the practical details that affect results on grades: how to measure rise and run, when to choose a stepped versus rackable layout, what footing details keep posts firm through freeze-thaw cycles, and how to hang gates that clear the ground without big gaps pets can exploit.
Measure Grade, Lines, and Obstacles Before You Sketch
Start with the grade itself. Stretch a mason’s line between batter boards and measure the drop with a line level, a 4-foot level on a straight 2×4, or a builder’s transit. Note the total rise or fall over each run and where it changes. Confirm property pins and call 811 for utility marking before staking post locations. Mark irrigation heads, roots, and swales; a sprinkler main or drainage channel in the wrong spot can force a different post spacing. Local installers, such as the Greenwald Exteriors fence company, often publish panel rack limits and common post spacings, which help you sketch a layout that matches available materials.
Convert those measurements into steps or rack angles on paper. For example, if your 60-foot side yard drops 18 inches and you plan 6-foot panels with 8-foot post centers, you might step three times by 6 inches or use rackable panels at roughly a 1.5-inch drop per foot of panel. Sketch gates where the grade is most forgiving, and note driveways, patios, or retaining walls that may need special hardware or core drilling.
Choose Between Stepped and Rackable Panels
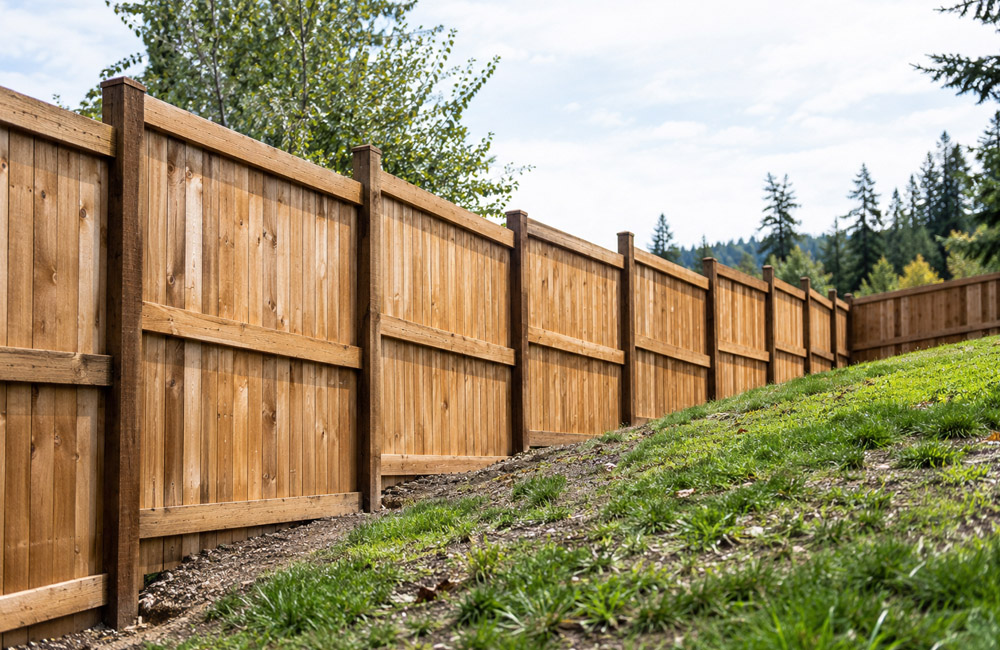
Stepped fences keep rails level, dropping at each post by a fixed increment. They work cleanly with wood privacy (2×4 rails with individual pickets) and can look intentional, like terraces. The trade-off is bottom gaps on the uphill side of each step; add a trim board or custom-cut pickets to close them. Rackable panels tilt so rails follow the grade, reducing gaps. Many aluminum and some vinyl systems let pickets pivot within the rails to a specified maximum angle; exceeding that angle can kink the rail or stress brackets.
Match the approach to the function. A family with a dig-prone dog on a yard that falls 10 inches across 40 feet often prefers rackable aluminum so the bottom rail tracks the ground, then adds tension wire or a small mow strip to deter digging. A pool barrier on a steep section may be better as stepped wood to keep the top uniform for latch alignment and to meet code that limits climbable conditions and bottom gaps. Wood picket runs can also be “contoured”: set rails roughly parallel to grade and cut each picket to a scribed line for a smooth top or bottom.
Set Posts for Strength and Water Management
Footings fight gravity and water. As a general rule, dig post holes at least one-third of the above-grade height and below local frost depth, with a diameter about three times the post thickness. In clay, bell the bottom of the hole to resist heave; in sandy soil, widen the top 12 inches for stability. Tamp 4 to 6 inches of compacted gravel at the base for drainage, set the post plumb to a string line, and backfill with concrete crowned at the surface to shed water. In wet spots, stop the concrete an inch below grade and cover it with soil or rock to avoid a water-catching “collar.”
Slopes add layout pitfalls. A common mistake is setting all posts to the same finished height before deciding step sizes; that leaves crooked rails and awkward mid-panel cuts. Instead, pull a tight string for each step run and mark finished post heights on the actual posts before you pour. Keep spacing consistent along the slope by measuring horizontally, not along the ground. Where wind loads are high, or gates are wide, consider galvanized steel posts with wood sleeve kits for stiffness. On steep runs, pin footings with short rebar dowels into undisturbed soil and avoid placing concrete footings in swales that should carry runoff.
Plan Gates Around Slope, Swing, and Hardware
Gates need clearance and rigidity. If a fence line falls toward the latch side, hinge the gate to swing downhill when possible to increase ground clearance. Use adjustable hinges so you can tweak both rise and in-and-out alignment after the posts settle. On wood gates, install a diagonal brace from the bottom hinge side to the top latch side to counter sag, and tension it with a cable kit if weight is an issue. For aluminum systems, use manufacturer-specific hinge and latch sets rated for your panel width, and note any rack limits at the gate frame.
Set the bottom gap deliberately. On a gentle slope, a 1.5 to 2-inch gap clears most patios and roots without inviting small pets to slip under. On steeper pads or gravel drives, rise-and-fall hinges or a small gate wheel can help a longer leaf clear the grade, though wheels can catch on uneven surfaces. Align latches after final adjustments, and add a drop rod or cane bolt at the meeting stile on double drive gates so both leaves close without racking. Where snow builds up, plan swing direction away from typical drifts and keep threshold boards removable.
Codes, Neighbors, and Aftercare on Sloped Runs
Codes and drainage don’t bend for fences. Many pool codes measure height from finished grade on the outside, so a stepped fence that shortens on the low side may no longer comply. Likewise, bottom gaps that are fine on level ground can exceed limits on a slope. Preserve swales and downspout paths; a bottom rail pressed into a drainage channel can back water onto a neighbor’s lawn or undermine your own footings. If you build near a retaining wall, use standalone fence posts with footings engineered for surcharge loads rather than fastening posts to wood landscape timbers that are not designed as structural members.
Plan simple upkeep to protect slope work. Walk the line each season to tighten gate hardware, re-level soil that eroded under panels, and touch up sealant on cut ends of cedar or pressure-treated lumber. Watch for frost heave that lifts one side of a gatepost, and re-pack gravel or re-seat the post if needed. Keep mulch or a narrow strip of river rock under privacy panels to control splashback and reduce rot near grade. Small, steady adjustments and good water-shedding habits around posts keep stepped and rackable runs aligned and swinging freely for years without expensive rework.